 While love craftsmen and women, we don’t always love paying them for simple household problems, and we’re willing to bet you don’t either. Here are five easy fixes for common household repairs.
Retrieve a valuable from down the drain
You will need: bucket, slip joint pliers, drain cover, WD40
If you drop an earring or other valuable down your drain, don’t despair. You can probably get it out. The first thing to do if you loose something down a sink is to turn off the tap. Then, quickly cover the drain to prevent the object from washing further down the pipe. Next, remove the sink trap. The sink trap is the curved piece of pipe under the sink that exists to prevent sewer gas from leaking up into your home. Hopefully, it will also have caught your treasure.
Your sink trap will be made of either metal or PVC piping. Removing it will require a bucket and a pair of slip joint pliers. Place the bucket on the floor under the piping and use the pliers to loosen the two slip nuts on either end of the sink trap. Spray on a little WD40 if you have trouble with the nuts. Remove the slip nuts and the washers (slender metal rings) and then take off the sink trap. Carefully empty the water inside the sink trap into your bucket. Is your treasure there? If not, uncover the drain and run a little water through the pipe and into the bucket. If you still don’t find what you’re looking for, sorry. You’re out of luck; it’s already outside your house.
To replace the sink trap, first put washer and then the slip nut on the end of the drain. Then, align the trap with the end of the drain and position the washer over the point where the two pipes meet. Put the slip nut over the washer and tighten it with your hands. Next, do the same with the end of the trap that meets the pipe in the wall. Finally, tighten both slip nuts with your slip-joint pliers. Make sure that the bucket is still under the sink trap and turn the water on lightly to check for leaks. If you have leaks, tighten the slip nuts a little more.
Unplug a toilet
You will need: 2 buckets, plunger, Vaseline if needed, closet auger if needed.
To unplug a toilet, first turn off the water supply for the toilet. Most toilets have a small valve located behind them, on the floor or lower wall. If you do not have a valve for the toilet, first fill 2 buckets with water and then turn off all of your water with your house’s main supply shut-off valve.
Next, pour a bucket of water into the bowl of your toilet to make sure that the toilet is at least half full. For stubborn clogs, try rubbing Vaseline around the rim of your plunger to increase suction. Position the plunger in the toilet bowl over the drain hole and pump it up and down a few times. If you’re successful, you will probably see some of whatever is blocking the toilet get sucked back into the bowl. It’s often accompanied by a splooshing noise. If this doesn’t happen, repeat pumping.
For particularly stubborn clogs, you might try using a closet auger, also called a plumber’s snake, available at most hardware stores. Put the corkscrew end into the drain hole, positioning the auger’s rubber tubing so as to protect your toilet bowl. Turn the handle clockwise and allow the spring to find its way through the toilet hole until the spring makes contact with the blockage and the crank on the auger becomes hard to turn. Continue turning clockwise as you carefully remove the spring from the drain hole. Clean the end of the spring and pour water into the toilet to see if the clog is gone. If it isn’t, use the auger a few more times. If the blockage still persists, it’s time to call a plumber.
Replace a wall outlet
You will need: screwdriver, colored markers, masking tape, paper and pen or pencil, new wall outlet with the same amp and voltage rating as the original.
If an electrical wall outlet in your home stops working, it doesn’t necessarily mean that you’ll have to hire an electrician. You can replace the wall outlet yourself with a little know-how and a lot of caution. First, turn off all of the power to your house at the main circuit breaker or fuse box. Before starting work, test that the power is off in the wall outlet you plan to change.
Start work by unscrewing the cover plate and putting it to one side. Then, unscrew the receptacle in the outlet box and gently pull it away from the wall. Using colored markers and masking tape, label where each wire was connected to the outlet. Note the colors of the wires (take a photo on your phone) and screws and jot down how they attach. Then, loosen the screws holding the wires and remove the wall outlet.
Take the outlet to a hardware store and use it as a guide to purchasing a replacement with the same amp and voltage rating. Do not dispose of the old wall outlet, but bring it home with you as the old one will serve as a guide in attaching the new. Using your colored marks and your notes, carefully attach the wires in the wall to the new outlet. Make sure that the wires are wrapped clockwise around the terminals like they were when you removed the old wall outlet. If you are working with a three-pronged wall outlet, wrap the wire that goes with the green screw first. Tighten the screws around the wires, replace the new wall outlet, screw on the cover plate and turn the power back on.
Finally, test your work. If the wall outlet doesn’t function, turn the power back off and double check that the proper colored wires are in the right places. If the wall outlet still doesn’t work, give in and call an electrician.
Note: If you have minimal electrical experience and you want to change from a non-grounded (two-prong) outlet to a grounded (three-prong) outlet, it’s a good idea call an electrician. Also call a pro if your home has solid aluminum wiring. If your home has any aluminum wiring, make sure that the new outlet you buy is labeled CO/ALR. Old outlets that say CU/AL should also be replaced with new outlets reading CO/ALR.
Grease a hinge
You will need: WD40, punch or screwdriver and hammer if needed, steel wool if needed
You don’t have to put up with a squeaky door. A little WD40 applied properly will restore peace and quiet. Open the offending door and pull the pin halfway out of the squeaky hinge. Frequently, you will be able to remove hinge pins with your fingers. To take out more stubborn pins, place a punch at the bottom of the hinge and tap it with a hammer. If this does not work, use a screwdriver at the top of the hinge to pry the pin loose.
At first, only apply a little WD40. If you don’t have any WD40, you can substitute spray cooking oil, but it won’t last as long. Spray the lubricant directly onto the pin and into the hole in the hinge that the pin occupies, then reposition the pin and open and close the door a few times. If the noise persists, apply additional WD40 and open and close the door again. Work incrementally: start with tiny spray of WD40 and increase the amount each time you add more. Continue until the squeak disappears, then wipe the excess oil from the hinge with a paper towel or rag. For extremely persistent squeaks, try removing the pin entirely and cleaning it with steel wool.
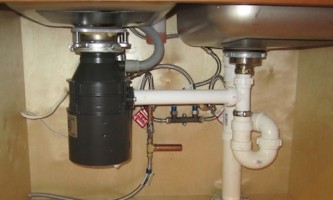
Free a clogged garbage disposal
You will need: flashlight, your garbage disposal owner’s manual, needlenose pliers, 1/4 Allen wrench or a broom handle
If your garbage disposal makes a strange humming noise, chances are it’s jammed. Shine a flashlight down the hole and see if the clog is visible. If so, turn the disposal’s electrical switch off and try to remove the clog with a pair of pliers. (If you’re fearless you could use your hand—but only if the power to the disposal unit has been turned off.)
If this fails, check your owner’s manual to see if your disposal has a reversal feature. If it does, run cold water down the drain and turn the disposal on. The reversal feature should kick in automatically, but you may have to turn your disposal on and off a few times to make sure. If your garbage disposal does not have a reversal feature, check to see if there is a hole in the bottom of the unit where you can insert a 1/4 inch Allen wrench. If so, turn off the power to your house at the circuit breaker or fuse box, insert the wrench and rotate it first clockwise, then counterclockwise. If you don’t have an Allen wrench, try inserting a broom handle into your disposal at the sink drain. Rest the handle against the disposal blades and turn it clockwise and then counterclockwise to loosen the lodged object.
After freeing the clog, take the broom handle out of the sink and remove the former obstruction with your pliers. Then, turn your power back on and push the reset button on the bottom of the disposal. Run cold water down the disposal for a moment and then turn it on. If the disposal won’t start, wait 15 or 20 minutes. Garbage disposals have an overload feature that stops the engine when it gets too hot. After waiting, hit the reset button again and use the disposal as you would normally.