
SAVE MONEY…
Rain barrels are not a new idea — people have been using rain barrels, or cisterns, for thousands of years to capture and store free water from the sky. Historical records show that rainwater was collected in simple clay containers as far back as 2,000 years ago. In recent years they have regained their popularity as drought conditions have persisted and local utility companies have raised rates. A one-inch rain event can generate up to 623 gallons of water on a 1,000 square foot roof, enough to fill over ten 55 gallon rain barrels! Tennessee receives, on average, 47 inches of rainfall per year. Assuming it was possible to catch all 47 inches of rain, almost 30,000 gallons of reusable water could be collected each year from the average Tennessee roof — more than enough for most families‟ outdoor water needs. Realistically, most people that have rain barrels, only have one. Let‟s say this one barrel holds 55 gallons. One quarter of a 1000 square foot roof would generate about 70 gallons of rain runoff each time it rained 1/2 inch. The challenge would then be to use the 55 gallons of stored water before the next rain event.
BY COLLECTING RAINWATER…
Why let good water go to waste when it can be collected, stored and used later? Benefits of using rain barrels include:
• Provides soft water for watering plants, washing cars and filling birdbaths or fish ponds
• Alleviates demand on municipal treatment systems
• Reduces polluted runoff
• Lowers water bills and in some cases stormwater charges
• Reduces flooding
• Recharges groundwater
…AND SAVE WATER TOO!
Since 30 to 40 percent of a home‟s summer water bill can go for outdoor use, a rain barrel can be part of the solution. Water collected in rain barrels isn‟t drinkable, but it‟s perfect for lawns and gardens and for use in ponds and birdbaths. Rainwater is naturally soft and free of minerals, chlorine and other chemicals, so plants thrive on it. It can be used for washing cars, decks and windows, too.
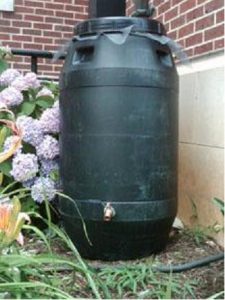
BUILDING A RAIN BARREL USING A 55 GALLON PLASTIC DRUM
Supplies
• 1 – 55 Gallon Plastic Drum (food grade)
• 1 – Hose Bib: 3/4” (spigot)
• Teflon tape or caulk
• Universal Sump Pump Hose Kit*
• 1 – 1 1/2” Conduit locknut, steel
• 1 – 1 1/2” Schedule 40 – 90° elbow
• 1 – Flex-A-Spout®
• 2 – 6 x 1/2 Slot Zinc Hex Washer Head Sheet Metal Screws
• 1 – Downspout Strainer (fits 3×4”and 4” round pipe)
Tools
• 1/2” Drill (corded is best)
• 4” Hole saw bit
• 1 7/8” Hole saw bit
• 1/4” Pilot drill bit
• 1” Speed bore bit
• Small hex drive bit
• Utility knife
• Safety glasses and gloves
*Note: The sump pump hose kit comes with a 24‟ foot corrugated hose, 2 different size adaptors and 1 hose clamp. These directions use the 1 1/2” adaptor, 1/2 of the hose, and the hose clamp. To make a 2nd rain barrel using the 1 1/4” adaptor included in the kit, you will need the following supplies: 1 steel hose clamp; 1 (1 1/4”) steel conduit locknut; 1 (1 1/4”) Schedule 40, 90° elbow; and a 1 5/8” hole saw.
INSTRUCTIONS
Before starting: clean barrel, purchase supplies, decide which downspout it will be attached to, mark hole locations and gather tools.
DRILL HOLES
1. Downspout — use 4” hole saw bit to drill hole on top of barrel over one of the existing holes.
2. Spigot — use 1” speed bore bit to drill hole on ”front” of barrel about 2” up from lower edge.
3. Overflow — use 1 7/8” hole saw with 1/4” drill bit to drill hole on “side” of barrel about 3” from upper edge. (Note: It is easier to screw in the elbow if this hole is located near the downspout hole.)
INSERT HARDWARE
4. Screw in hose bib (spigot) using Teflon tape or caulk, if necessary.
5. Install overflow hardware. Place locknut on adapter and insert into overflow hole from outside. The adapter threads will stick through the hole allowing the elbow to be screwed on from inside of the barrel.
PREPARE FLEX-A-SPOUT®
(FAS)
6. Measure downspout to determine which end of FAS fits it.
7. Cut the other end of the FAS above the “cut line” using a sharp utility knife. This end will be inserted into the barrel.
8. Screw in sheet metal screws across from each other on the round end of the FAS.
9. Compress downspout strainer and insert into round end of the FAS and let it expand. The screws should hold the strainer in place.
INSTALLING A RAIN BARREL
INSTALLING RAIN BARREL INSTRUCTIONS
1. Using shovel, set concrete blocks (or other base material) and level.
2. Set barrel on base.
3. Place strainer end of FAS into barrel.
4. Extend the FAS a small amount and mark the downspout where it needs to be cut.
5. Cut downspout using hacksaw.
6. Attach FAS to downspout according to directions on package.
7. Attached sump pump hose that has been cut to desired length to adaptor using hose
clamp.
Supplies
• 2- 4 Concrete blocks
• Hose clamp (sump pump kit)
• Hose (sump pump kit)
Tools
• Level
• Hacksaw
• Screwdriver
• Shovel
• Utility knife
THINGS TO CONSIDER BEFORE INSTALLING
1. Set barrel in desired location to determine placement of holes.
2. Select a barrel location near the area you intend to use the water.
3. For ease of use, raise the barrel so the spigot is high enough off the ground to allow for a bucket or watering can to be placed underneath.
4. Rain barrels work off of gravity. For better pressure, place barrel on an elevated, level surface
made from concrete blocks or composite lumber. Untreated wood may rot.
5. Ensure that an elevated barrel is level and secure to prevent tipping. A full 55 gallon barrel weighs
about 460 pounds.
6. Rain barrels can be connected or ‟stacked‟ to collect more water.
7. Consider painting your rain barrel. Clean with an ammonia base cleaner; prime with a plasticadhering
spray paint; and to apply a design, use acrylic paints.
USING AND MAINTAINING A RAIN BARREL
To maximize the benefits of your rain barrel, its stored water needs to be regularly drained so that there will be storage space for the next rain. The water may be used to sustain your garden plants or lawn or if the soil is already saturated from a rainfall, you could also consider storing it for household purposes like watering house plants and washing your car or house windows.
MAINTAINING AND USE TIPS:
• Watering Can Access: If spigot is not high enough, attach a short section of water hose to spigot or slightly turn spigot to the side so that bucket does not have to fit under it.
• Transport: Consider attaching soaker hose to spigot to allow for the gradual release of water or using a pump when water needs to be transported uphill.
• Overflow & Unused Stored Water: Direct all excess water into lawn or bed area, away from house foundation. While on vacation, attach water hose to open spigot so that water drains out slowly instead of overflowing and potentially causing damage to your house.
• Contamination Considerations: Barrel water has bacteria in it so it is not for human consumption. Also, if water is used for vegetable plants, ensure vegetables are well washed before consumption.
• Barrel Cleaning: Inspect strainer regularly and clean out as needed. Inspect barrel insides in both the fall and spring and clean as required.
• House Cleaning: When cleaning siding or roof with soap or chemicals, disconnect barrel!
• Winter Care: Barrels can be left outdoors, however, unless collecting water to use during the winter months, attach water hose to open spigot and drain water onto lawn or in bed area.
• Mosquitoes: To control, consider using Bti donuts or granules (e.g., Mosquito Dunks®). Bacillius thuringiensis israelensis (Bti) is a live bacterium that kills mosquito larvae that can be placed in the barrel. It is harmless to pets, birds and humans.
Plant Water Needs
Most plants ideally need about 1″ of water per week. To meet this requirement, apply:
> 1/2 gallon to plants with a canopy spread of 1 foot
> 2 gallons to plants with a canopy spread of 2 feet
> 4.5 gallons to plants with a canopy spread of 3 feet
> 8 gallons to plants with a canopy spread of 4 feet
> 12 gallons to plants with a canopy spread of 5 feet
> 18 gallons to plants with a canopy spread of 6 feet
To maintain planted areas, the 55 gallons stored in a barrel can provide 1″ of water over the following areas:
• One time to 88 sq ft (4‟x22‟)
• Two times to 44 sq ft (4‟x11‟)
• Three times to 29 sq ft (4‟x7.25‟)
• Four times to 22 sq ft (4‟x5.5‟)
Originally published by the University of Tennessee Institute of Agriculture, UT Extension
However
Record droughts and water-supply worries serve as catalysts for state legislatures to consider legislation legalizing the catchment and use of rainwater for use in households and for lawns. There is increased interest in recent years in legislation allowing, defining, and clarifying when rainwater harvesting may occur. Rainwater harvesting is the act of utilizing a collection system to use rainwater for outdoor uses, plumbing, and, in some cases, consumption.
In some states, especially those out West, previous water law stated all precipitation belonged to existing water-rights owners, and rain needed to flow to join its rightful water drainage. In other states, legislators must ensure water-quality standards and public health concerns are met when considering rainwater harvesting legislation.
Texas and Ohio are among states devoting a considerable amount of attention to this issue, and enacted numerous laws regulating the practice of rainwater harvesting. Rhode Island, Texas, and Virginia offer tax credits or exemptions on the purchase of rainwater harvesting equipment. Both Texas and Ohio allow the practice for potable purposes, which is frequently excluded from other states’ laws and regulations. Oklahoma passed the Water for 2060 Act in 2012, to promote pilot projects for rainwater and graywater use among other water saving techniques.
Read more about local laws here…..